iOS SDK 개발 가이드
이 가이드는 아래 내용들을 안내합니다.
▶︎ Shoplive Short-form iOS SDK 설치 요약
CocoaPods로 설치하기
Podfile에 아래 코드를 추가하세요.
source 'https://github.com/CocoaPods/Specs.git'

    # Project에 설정된 최소 지원 버전과 동일하게 설정하세요.
    # Shoplive iOS SDK는 iOS 11.0 이상을 지원합니다. iOS 11.0 미만으로 설정할 수 없습니다.
    platform :ios, '11.0'
    use_frameworks!

    # Shoplive iOS SDK를 설치할 Project Target을 설정하세요.
    target 'ShortformProj' do
        pod 'ShopliveShortformSDK', '1.5.6'
      	pod 'ShopliveSDKCommon', '1.5.6'
    end
Swift Package Manager로 설치하기
Package Dependencies 에 다음을 추가하세요.
https://github.com/shoplive/shortform-ios.git
https://github.com/shoplive/common-ios.git
dependencies: [
    .package(url: "https://github.com/shoplive/shortform-ios", .exact(from: "1.5.6")),
    .package(url: "https://github.com/shoplive/common-ios", .exact(from: "1.5.6"))
]
설치가 실패한다면 캐시를 지워주세요.터미널에서 다음의 커맨드를 실행하여, 캐시를 삭제해주세요.
rm -rf ~/Library/Caches/org.swift.swiftpm
rm -rf ~/Library/org.swift.swiftpm
하이브리드 연동하기
고객사 웹 UIViewController에 아래 코드를 추가하세요.
import ShopLiveShortformSDK

class CustomerViewController: UIViewController {
    ...
    override func viewDidLoad() {
        super.viewDidLoad()
        ShopLiveShortform.BridgeInterface.connect(webview) // Required
        ShopLiveShortform.ShortsReceiveInterface.setHandler(self) // Required
    }
    ...
}

extension CustomerViewController: ShopLiveShortformReceiveHandlerDelegate {
    func handleShare(shareUrl: String) {
      // Do something
    }

    func onError(error: Error) {
      // Do something
    }

    func onEvent(command: String, payload: String?) {
      // Do something
    }

    func onDidAppear(){
      // Do something
    }

    func onDidDisAppear(){
      // Do something
    }
}
ShopLiveShortform.BridgeInterface
Webview를 BridgeInterface 에 연결만으로 다음과 같은 기능이 제공됩니다.
- 상품화면을 나가면 자동으로 preview를 종료합니다.
- 숏폼 미리보기, 보기, 닫기가 동작합니다.
ShopLiveShortform.ShortsReceiveInterface
고객사 웹 UIViewController 에 ReceiveInterface 핸들러를 설정하면, 다음과 같은 callback 을 사용할 수 있습니다.
// 공유하기 버튼을 눌렀을 때, 공유 URL을 전달합니다.
func handleShare(shareUrl: String)

// 에러가 발생하면 에러를 전달합니다.
func onError(error: Error)

// 숏폼에서 발생한 이벤트를 전달합니다.
func onEvent(command: String, payload: String?)
// 숏폼 화면의 닫힘 이벤트를 전달합니다.
func onDidDisAppear()

// 숏폼 화면의 열림 이벤트를 전달합니다.
func onDidAppear()// Connect Webview to BridgeInterface
ShopLiveShortform.BridgeInterface.connect(webview) // Required네이티브 연동하기
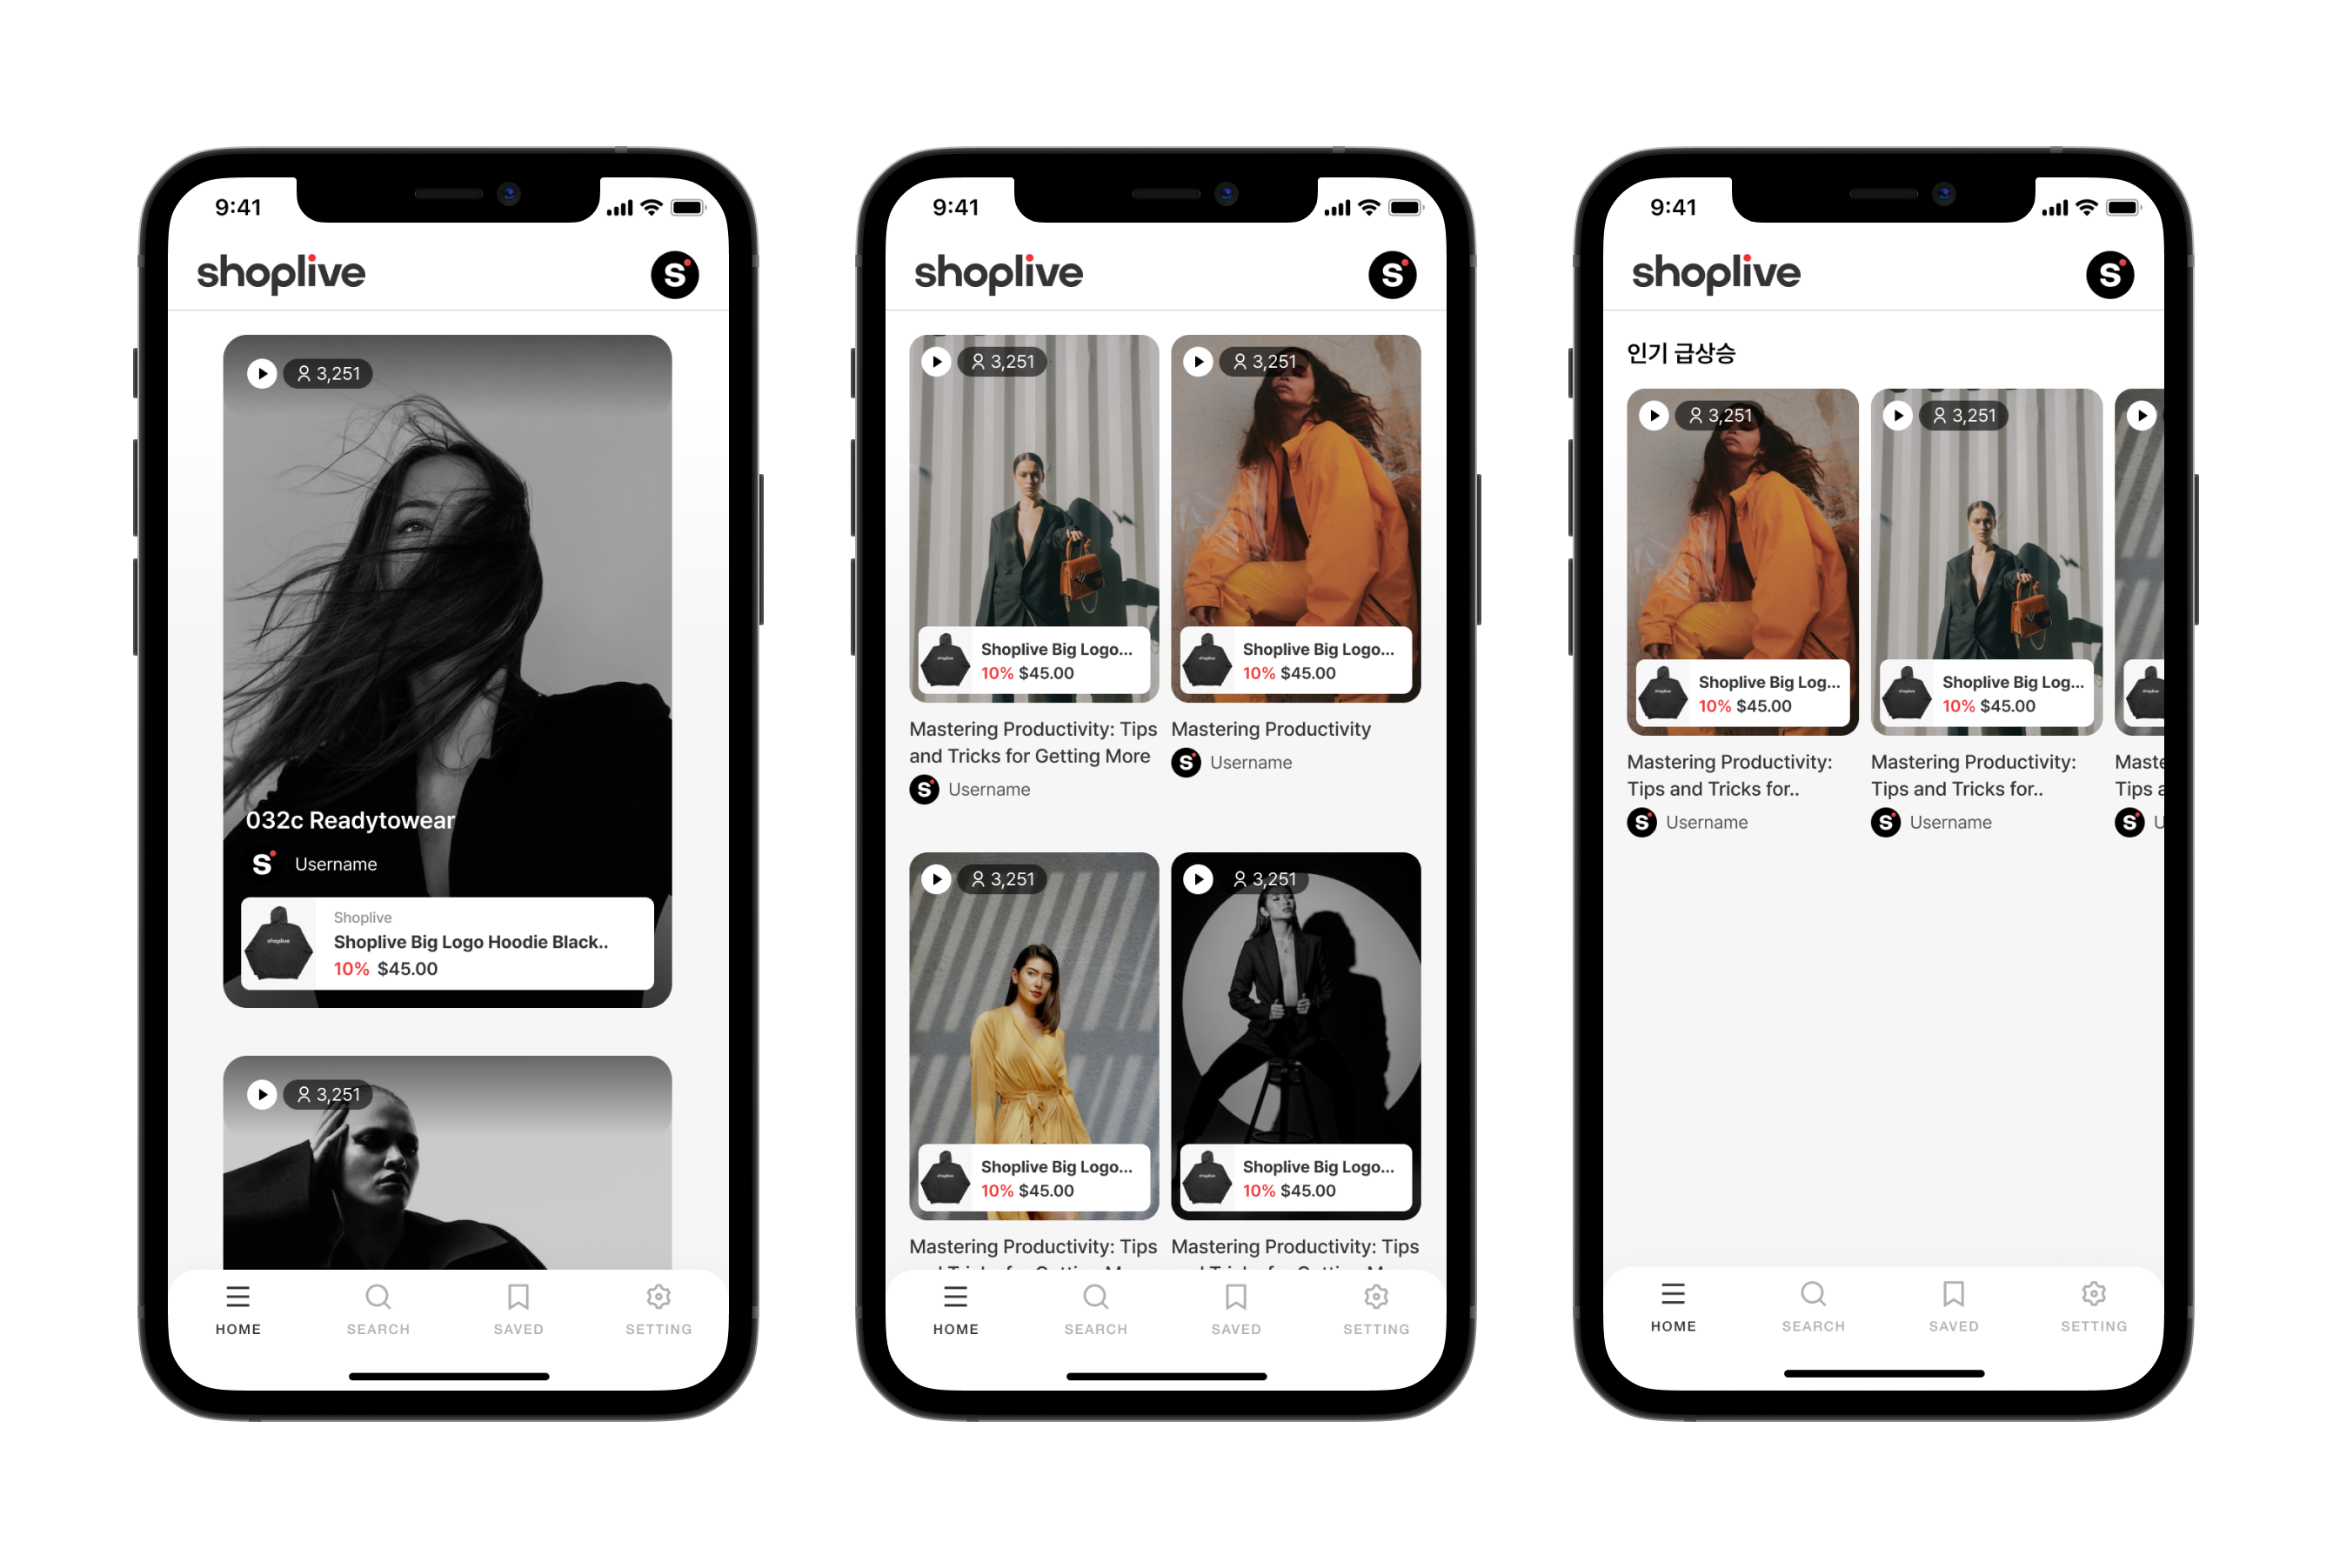
Type1

좌측 - ShopLiveShortformCardTypeView
중앙 - ShopLiveShortformVerticalTypeView
우측 - ShopLiveShortformHorizontalTypeView
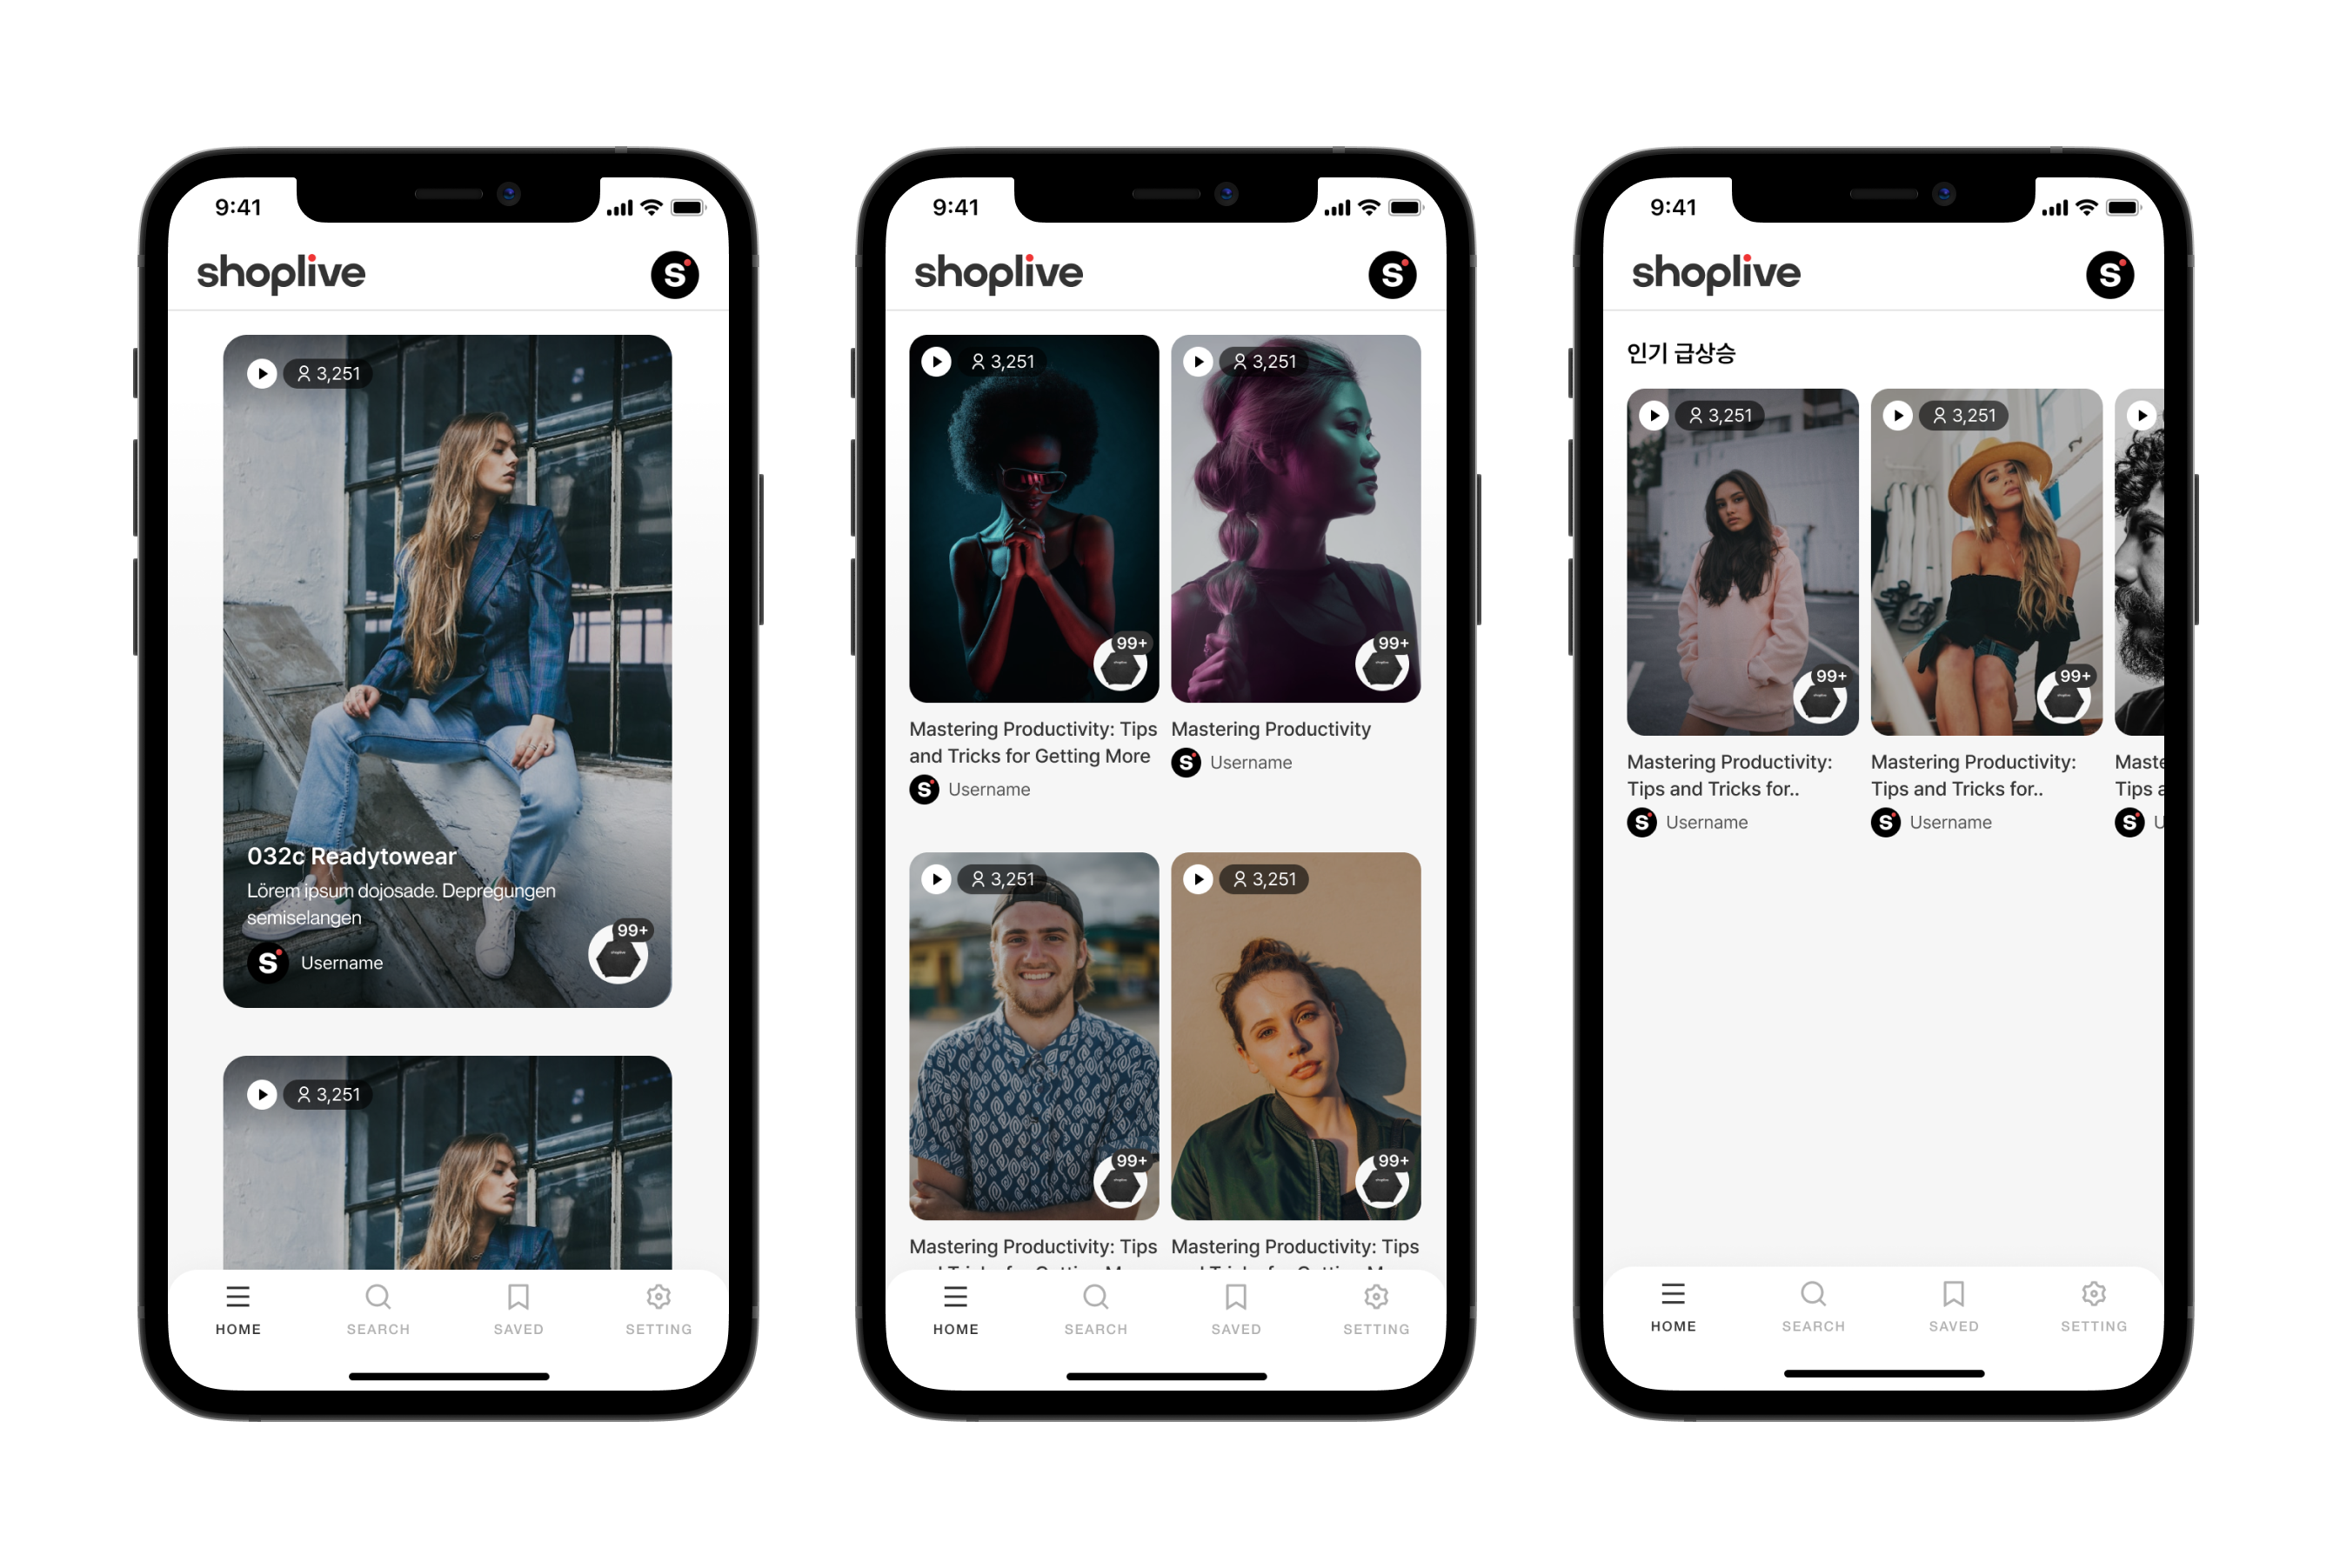
Type2

좌측 - ShopLiveShortformCardTypeView
중앙 - ShopLiveShortformVerticalTypeView
우측 - ShopLiveShortformHorizontalTypeView
Short-form의 목록을 원하는 곳에 3가지 형식으로 노출할 수 있습니다.
영상의 비율은 9 : 16입니다.
- 콘텐츠 집중형 (CARD)
- 세로 스크롤 (VERTICAL)
- 가로 스크롤 (HORIZONTAL)
콘텐츠 집중형 (ShopLiveShortformCardTypeView) 적용하기
콘텐츠 집중형 목록을 노출할 화면에 다음과 같이 구성합니다.
private var builder = ShopLiveShortform.CardTypeViewBuilder()

lazy private var cardTypeView : UIView = {
  let cardTypeView = builder.build(cardViewType: .type1,
                                       enableSnap: true,
                                       enablePlayVideo: true,
                                       playOnlyOnWifi: false,
                                       cellSpacing: 20,
                                       avAudioSessionCategoryOptions : .mixWithOthers).getView()
  return cardTypeView
}()
view.addSubView(cardTypeView)
//set constraints
세로 스크롤 (ShopLiveShortformVerticalTypeView) 적용하기
세로 스크롤 목록을 노출할 화면에 다음과 같이 구성합니다.
private var builder = ShopLiveShortform.ListViewBuilder()

lazy private var verticalTypeView : UIView = {
  let verticalTypeView = builder.build(cardViewType: .type1,
                                       listViewType: .vertical,
                                       enableSnap: true,
                                       enablePlayVideo: true,
                                       playOnlyOnWifi: false,
                                       cellSpacing: 20,
                                       avAudioSessionCategoryOptions : .mixWithOthers).getView()
  return verticalTypeView
}()

view.addSubView(verticalTypeView)
//set constraints
가로 스크롤 (ShopLiveShortformHorizontalTypeView) 적용하기
가로 스크롤 목록을 노출할 화면에 다음과 같이 구성합니다.
private var builder = ShopLiveShortform.ListViewBuilder()

lazy private var horizontalTypeView : UIView = {
  let horizontalTypeView = builder.build(cardViewType: .type1,
                                       listViewType: .horizontal,
                                       enableSnap: true,
                                       enablePlayVideo: true,
                                       playOnlyOnWifi: false,
                                       cellSpacing: 20,
                                       avAudioSessionCategoryOptions : .mixWithOthers).getView()
  return horizontalTypeView
}()
view.addSubView(horizontalTypeView)
//set constraints
속성 적용하기
Updated 21 days ago
